Knowing how to measure a chainsaw bar correctly is a critical safety protocol that prevents dangerous kickback events and catastrophic equipment failure. A simple sizing error, often caused by measuring the entire physical bar from tip to tip, leads directly to ordering incompatible replacement parts. This mismatch not only causes poor cutting performance but also places excessive strain on the saw’s engine, resulting in accelerated wear and costly operational downtime.
In this comprehensive guide, we’ll walk you through the exact professional method used by service technicians and forestry equipment suppliers. You’ll also learn how to match bar length with engine displacement (CC), and how to avoid common sizing errors that reduce performance and damage your saw.
What is Chainsaw Bar Length?
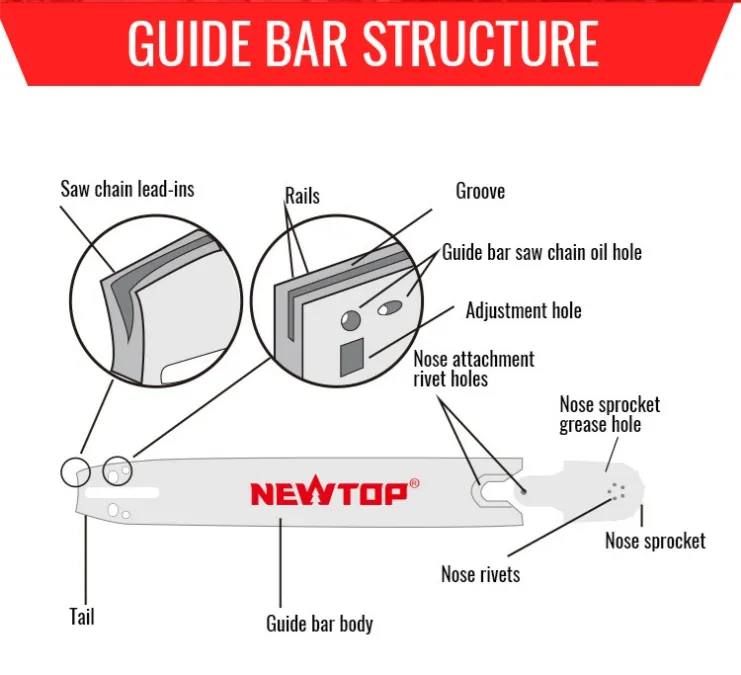
The guide bar is the long steel plate that supports and guides the chain during cutting. However, a portion of the bar sits inside the chainsaw body (the powerhead). That internal section does not contribute to cutting capacity.
Understanding Effective Cutting Length
Chainsaw bar length refers to the effective cutting length of the guide bar — not the total metal length from end to end. Technicians measure from the front of the saw’s body to the furthest tip of the bar, which represents the maximum width of wood you can cut in a single pass. When manufacturers list a bar as 16-inch, 18-inch, or 20-inch, they are referring to the usable cutting length, measured from the front of the saw housing to the tip of the bar.
How Bar Size Relates to Pitch and Gauge
While length is the primary specification, it works directly with pitch and gauge to create a compatible and safe cutting system. Pitch defines the distance between the chain’s drive links, and gauge measures the thickness of those links. The bar’s groove must match the chain’s gauge perfectly for proper function. Common pitch sizes are 0.325″ and 3/8″, while standard gauge sizes include .050″, .058″, and .063″. Mismatching these critical measurements leads to poor cutting performance, chain derailment, and accelerated wear on the bar and sprocket.
Matching Bar Length to Application and Power
The ideal bar length depends entirely on the saw’s engine power and the job at hand. A longer bar requires more torque to drive the chain through dense wood, while a shorter bar provides better control and maneuverability for precise tasks. The relationship between length, power, and application is straightforward.
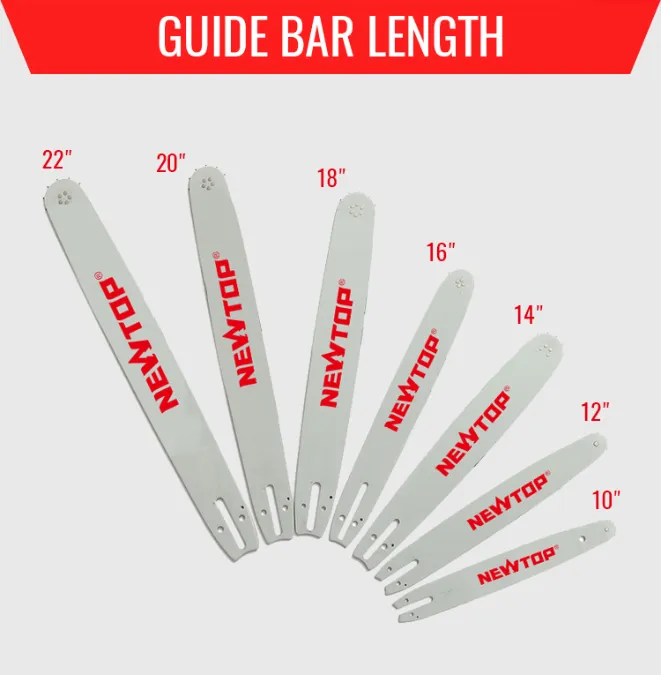
- Shorter Bars (10–16 inches): Suited for saws with smaller engines. They are ideal for light tasks like pruning, limbing, and cutting small firewood where control is paramount.
- Medium Bars (16–20 inches): These are versatile all-rounders, common on homeowner and semi-professional models. They offer a good balance of cutting capacity and control for felling medium-sized trees.
- Longer Bars (22–30+ inches): Designed exclusively for powerful, professional-grade saws. These bars are used in forestry and land-clearing for felling large-diameter trees where maximum cutting width is necessary.
Different chainsaw types—such as gas, electric, or top-handle models—have varying bar length requirements. Learn more about the different types of chainsaws and how they influence your bar selection.
Step 1: Measuring the Effective Cutting Length (Called Length)
The industry-standard ‘called length’ is determined by measuring the bar’s usable cutting area from the tip to the saw’s body and rounding to the nearest standard size, a critical first step for ensuring correct chain and bar compatibility.
| Raw Measurement Example | Rounding Rule | Standard “Called Length” |
|---|---|---|
| 17.75 inches | Round to the nearest standard size (typically 2-inch increments). | 18 inches |
| 15.8 inches | Round to the nearest standard size (typically 2-inch increments). | 16 inches |
| 19.9 inches | Round to the nearest standard size (typically 2-inch increments). | 20 inches |
The Standard Measurement Technique
To find a chainsaw bar’s size, you measure its effective cutting length, also known as the “called length.” This is the only measurement that matters for part identification. For an accurate reading, keep the bar attached to the saw. Place the end of a tape measure at the very tip of the bar and extend it back to the point where the bar enters the chainsaw’s housing. The resulting distance is the effective cutting length, which represents the usable portion of the bar.
Rounding to Match Standard Bar Sizes
Your raw measurement must be converted to a standard commercial size. Chainsaw bars are manufactured and sold in fixed sizes, usually in two-inch increments like 16, 18, or 20 inches. If your measurement is 17.75 inches, you have an 18-inch bar. Always round your measurement to the nearest whole inch to identify its commercial classification. This industry standardization is what simplifies the process of buying replacement parts and guarantees that components from different batches or manufacturers will fit correctly.
Why This Measurement Is Foundational
Getting the effective length correct is the most important step in identifying your equipment. An incorrect measurement has a direct effect on cutting capacity, chain fitment, and operator safety. The called length determines the maximum diameter of wood you can cut in a single pass and is a required specification for purchasing the correct replacement chain. Using a bar that is too long for the saw’s engine will strain the motor, reduce performance, and create unsafe operating conditions.
Watch this step-by-step video, you’ll learn the proper technique for measuring your chainsaw’s effective cutting length. After watching, continue to Step 2 to count the drive links on your chain and make sure your saw and bar fit perfectly.
Step 2: Locating and Counting Drive Links on the Chain
An incorrect drive link count is a primary cause of chain derailment and operational failure, making an accurate manual count a critical maintenance step for safe equipment function.
| Verification Method | Purpose & Rationale | Common Pitfall to Avoid |
|---|---|---|
| Manual Count | Confirms the exact number of links required for the bar, preventing slack or excessive tension that leads to failure. | Losing count mid-way. Always mark the starting link with tape or a paint pen to ensure an accurate tally. |
| Check Stamped Bar Info | Provides the manufacturer’s exact specification (often abbreviated as “DL”) for quick and accurate chain replacement. | Relying on worn, illegible markings on an old bar. If you cannot clearly read the numbers, default to a manual count. |
What is a Drive Link and Why Does the Count Matter?
Drive links are the protrusions on the underside of the chain that sit inside the guide bar’s groove. They engage with the chainsaw’s drive sprocket to propel the chain and guide it along the bar. An accurate count of these links is fundamental for proper fitment. If the chain has too few links, it won’t fit onto the bar. If it has too many, the chain will be too loose, leading to poor cutting performance, binding, and a high risk of derailment during operation. The drive link count determines the precise length of the chain needed for a specific bar, ensuring safe and efficient power transfer from the engine to the wood.
A Reliable Method for Counting Drive Links Manually
To avoid errors, use a systematic counting method. First, remove the chain from the saw and lay it out on a flat, clean surface like a workbench or floor. This straightens the chain completely and prevents tangles that cause miscounts. Mark your starting drive link with a piece of tape or a paint pen to create a clear reference point. From there, carefully count each individual drive link until you return to your marked link. For better accuracy, count in small groups, such as by fives, and then perform a second count to verify your final number.
Where to Find Drive Link Information on Your Equipment
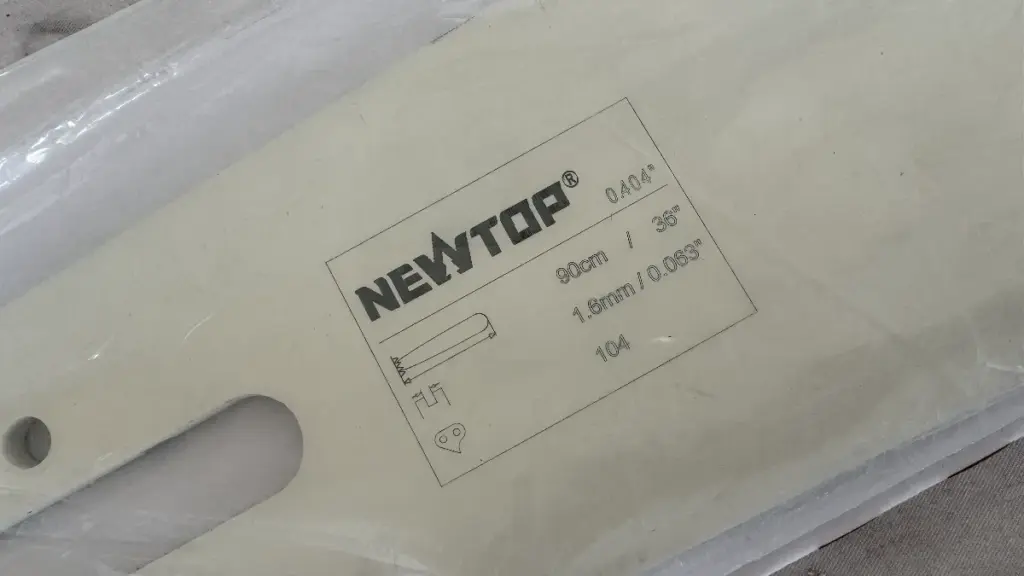
Many manufacturers stamp or laser-etch the required drive link count directly onto the guide bar to simplify replacement. Inspect the tail end of the bar, near the area where it mounts to the saw body. This information is often listed alongside the bar’s required pitch and gauge specifications. The drive link count is typically abbreviated as “DL” followed by a number (e.g., “72DL”). Even when this information is available, performing a manual count on your old chain remains a reliable verification method, especially if the bar is worn or the markings have become difficult to read.
Step 3: Determining Bar Gauge and Pitch for Perfect Fitment

Getting the pitch and gauge right is non-negotiable; these two measurements act as a lock-and-key system, and a mismatch guarantees poor performance and significant safety risks.
| Measurement | Technical Definition | Common Industry Sizes |
|---|---|---|
| Pitch | The distance between the centers of three consecutive rivets on the chain, divided by two. | .325″, 3/8″, 1/4″ |
| Gauge | The thickness of the drive links, which must match the width of the bar’s groove. | .043″, .050″, .063″ |
Understanding Pitch and Gauge
Pitch and gauge are the two critical measurements that ensure your chain and guide bar function as a single, efficient system. A proper match is essential for safe operation. Pitch defines the spacing between drive links, while gauge sets the thickness of those links. This ensures the chain seats perfectly within the bar’s groove, preventing binding or derailing during high-speed operation.
How to Measure and Identify
The most efficient way to find these measurements is to look for the information stamped directly on the tail of the guide bar, near the mounting slots. If the markings are worn or unreadable, your chainsaw’s operator manual is the next best source. It will list the exact factory specifications for your model.
- Check the base of the bar for stamped numbers that specify both pitch and gauge.
- Consult your chainsaw’s instruction manual for the original equipment specifications.
- If you are still unsure, bring the bar or saw to a local dealer for professional identification.
Why Matching Matters
Using a mismatched chain and bar introduces immediate operational problems and safety hazards. For the cutting system to work, the chain pitch, the drive sprocket pitch on the saw, and the bar’s nose sprocket pitch must all be identical. Any deviation breaks this alignment and causes performance failure.
- An incorrect pitch causes the chain to bind or jump in the groove, leading to poor cutting and potential kickback.
- If the gauge is too thin for the bar’s groove, the chain will wobble and can easily derail.
- If the gauge is too thick, the chain will bind, generating excessive friction, heat, and wear on both the bar and the engine.
Your Partner for Reliable, Profitable Power Tools
Pros and Cons of Using Longer vs Shorter Bars on One Saw
Selecting the right bar length is a critical balance between the cutting capacity needed for a job and the saw’s engine power, where shorter bars prioritize control and longer bars maximize reach and efficiency.
Advantages and Disadvantages of Shorter Bars (12-18 inches)
Shorter bars offer superior control and safety, making them ideal for homeowners and light-duty tasks like trimming limbs or cutting small trees. Their compact size reduces operator fatigue and minimizes the risk of dangerous kickback, a significant advantage for users with less experience. This category of bar dominates the homeowner market because it provides a good balance of capability and manageability.
- Easier to handle and maneuver in tight spaces.
- Lower kickback potential, making them safer for less experienced users.
- Requires less engine power, putting less strain on the saw.
- Limited cutting diameter, making them inefficient for felling large trees.
Advantages and Disadvantages of Longer Bars (20+ inches)
Longer bars provide a greater cutting capacity, allowing professional users to fell large-diameter trees and buck thick logs more efficiently. This performance comes at the cost of increased weight, reduced maneuverability, and a higher demand for operator skill. A long bar allows for cutting through thick logs in a single pass, which is essential for productivity in commercial forestry and farm applications.
- Enables cutting through wider logs in a single pass, increasing productivity.
- Provides extended reach for felling and limbing.
- Heavier and more difficult to balance, leading to quicker operator fatigue.
- Requires a more powerful engine to drive the chain effectively without bogging down.
Finding the Right Balance: Engine Power and User Skill
The best bar length for a chainsaw is a trade-off between the saw’s engine displacement (CCs) and the operator’s physical ability and experience. Overloading a small engine with a long bar leads to poor performance, slow cuts, and premature wear on the clutch and engine components. It’s not just about what fits; it’s about what the powerhead can realistically drive through dense material.
- Always match the bar length to the manufacturer’s recommended range for your saw’s engine size.
- A bar that is too long for the powerhead will cut slowly and strain the engine.
- Consider the type of wood; hardwoods require more power, often favoring a slightly shorter bar for a given engine.
- Operator experience is crucial, as longer bars amplify the forces of kickback and demand more physical control.
Common Sizing Mistakes: Why “End-to-End” Measuring Fails

Measuring the total physical length of a chainsaw bar instead of its functional cutting length is the primary cause of equipment incompatibility and performance issues.
Measuring Total Bar Length Instead of Effective Cutting Length
A frequent mistake is measuring the entire physical bar from tip to tail. The correct industry standard is the “effective cutting length” or “called length,” which only measures the usable portion of the bar that extends from the chainsaw’s body. Measuring the full bar guarantees you will purchase the wrong size replacement chain and potentially other mismatched accessories.
- This error results in selecting a chain that is too long for the bar’s actual exposed cutting area.
- An end-to-end measurement does not reflect the functional length specified by manufacturers for matching chains and accessories.
Including Mounting Hardware in the Measurement
Operators often incorrectly include the part of the bar that fits inside the powerhead when measuring. This mounting section, or tail, does not contribute to cutting and artificially inflates the length. This inflated number leads directly to incorrect sizing and equipment that will not fit or function properly.
- Accurate measurement must begin where the guide bar emerges from the front of the chainsaw’s casing.
- Failing to exclude the mounting hardware leads to equipment incompatibility, poor performance, and potential safety risks from an improperly tensioned chain.
Forgetting to Round to the Nearest Standard Increment
Chainsaw bars are sold in standardized even-inch sizes, such as 16″, 18″, or 20″. If your measurement of the effective cutting length is slightly off, like 17.5 inches, you must round it to the nearest standard size, which would be 18 inches, to find the correct replacement part. The market does not produce fractional or odd-numbered bar lengths.
- Industry practice is to round the effective cutting length to the closest even-inch number for marketing and sales.
- Ignoring this convention can lead to searching for non-existent bar sizes and purchasing the wrong equipment.
Selection Guide: How to Match Bar Length to Engine Power (CC)
Matching the guide bar length to the engine’s displacement is critical for preventing clutch burnout and ensuring safe, efficient cutting performance.
Matching guide bar length to engine displacement (CC) is essential for maintaining cutting efficiency, protecting the clutch system, and extending engine lifespan. A bar that is too long for the engine’s torque output will reduce chain speed, increase vibration, and cause premature mechanical wear. Proper balance ensures smooth power transfer and safe operation.
| Engine Size (cc) | Typical Bar Length Suggestion (inches) |
|---|---|
| 25–35 cc | ~10–14″ |
| 35–45 cc | ~12–16″ |
| 45–60 cc | ~16–20″ |
| 60–80+ cc | ~20–28″ |
| 30–35 cc | 10–12″ (Light Duty) |
| 35–45 cc | 12–16″ |
| 45–55 cc | 16–20″ |
| 55–65 cc | 18–24″ |
| 65–80 cc | 24–32″ |
| 10–14″ and Up | Varies by Use Case |
For small engines between 25cc and 35cc, the ideal bar length is typically 10 to 14 inches. These compact saws are designed for pruning, limbing, and light firewood cutting. Installing a longer bar places excessive strain on the engine, especially when cutting hardwood.
Mid-range engines in the 35cc to 45cc category perform best with 14 to 16-inch bars. While some high-output 45cc models may technically accommodate an 18-inch bar, pushing beyond this range often results in slower chain speed and reduced efficiency under load.
For 45cc to 55cc engines, a 16 to 18-inch bar is generally optimal, with certain 50cc+ models capable of handling up to 20 inches when properly tuned. This range offers a strong balance between maneuverability and cutting capacity.
Professional-grade engines from 55cc to 70cc can reliably operate 18 to 24-inch bars, depending on torque design. Engines above 70cc are typically paired with 24-inch bars or longer for heavy forestry work.
Factors Beyond CC: Wood Type and Operator Skill
While engine displacement provides a solid baseline, the ideal bar length also depends on the type of wood and the operator’s experience level. Hardwoods like oak or maple require significantly more power to cut, so you might choose a slightly shorter bar than you would for cutting softwoods like pine with the same saw. Operator skill is also critical, as a longer bar is more difficult to control and increases the risk of dangerous kickback. A well-balanced saw with an optimal power-to-weight ratio reduces user fatigue and improves safety during extended work periods.
Consequences of an Incorrect Match
Using an improperly sized guide bar directly compromises both performance and operator safety. An underpowered setup, where the bar is too long for the engine, results in slow cutting, frequent chain stalling, and potential clutch burnout from the constant strain. Conversely, a bar that is too short for a powerful engine underutilizes the saw’s capability and makes the work less efficient. The most significant consequence is the increased safety risk—a poorly balanced saw is difficult to handle and significantly raises the probability of dangerous kickback events.
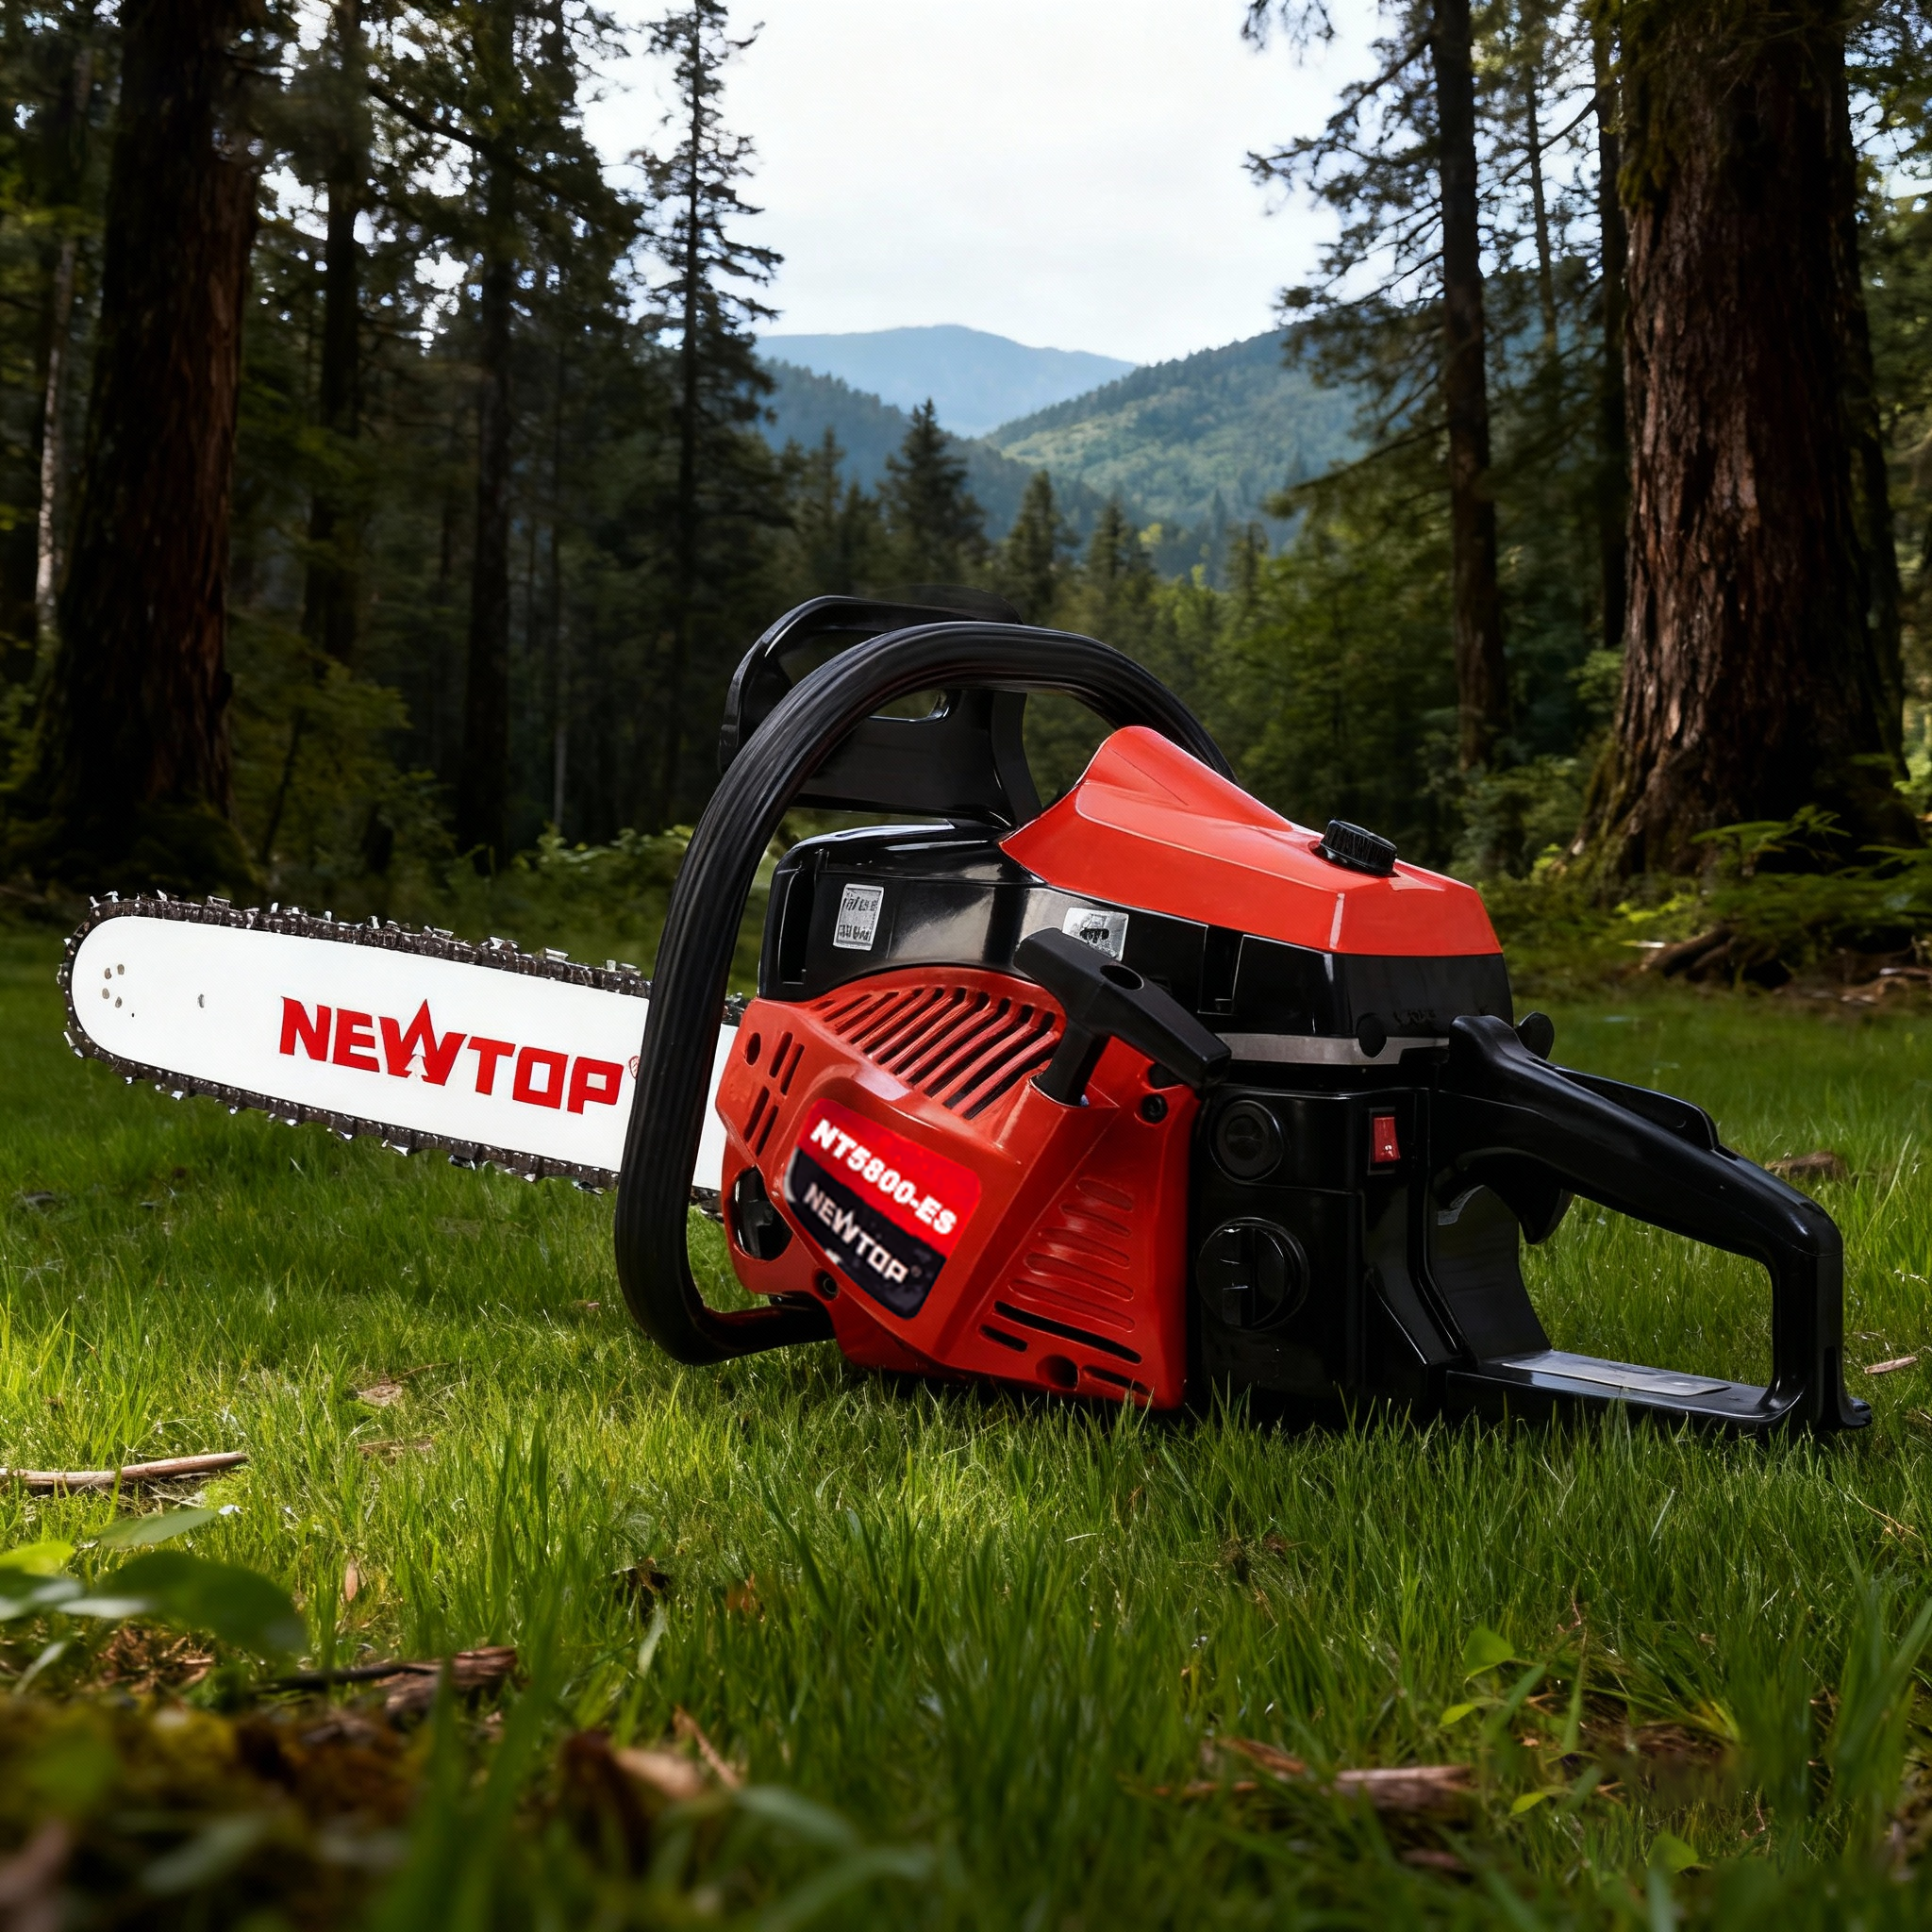
Why Choose NEWTOP Precision-Engineered Guide Bars?
NEWTOP’s guide bars combine globally sourced components with in-house precision manufacturing to offer professional-grade reliability and a strong cost advantage in competitive markets.
If you are sourcing replacement guide bars for retail, OEM branding, or distribution, it is critical to select a reliable chainsaw guide bar manufacturer.
NEWTOP has specialized in garden machinery and forestry tools since 2003. With over 10,000㎡ production facilities and advanced CNC machining centers, NEWTOP manufactures precision-engineered guide bars designed for durability and long service life.
What Sets NEWTOP Guide Bars Apart?
- High-grade alloy steel construction
- Precision rail hardening for wear resistance
- Accurate groove machining for smooth chain tracking
- Compatibility with major chain standards (.325″, 3/8″, .404″)
- Strict QC testing including rail straightness and hardness verification
NEWTOP products are exported to 65+ countries across Latin America, Africa, Southeast Asia, and Eastern Europe, supporting both OEM clients (60%) and brand distributors.
Whether you are replacing bars for professional logging or supplying regional dealers, NEWTOP offers stable supply, competitive pricing, and customizable packaging options.
If you’re looking to expand your product line with reliable chainsaw components, our engineering team can support OEM/ODM development tailored to your market needs.
Conclusion
Measuring a chainsaw bar’s effective length, pitch, and gauge is fundamental for ensuring safe operation and optimal cutting performance. These steps guarantee you select a compatible replacement, preventing premature equipment wear and costly purchasing errors. This precision directly contributes to the reliability and longevity of your tools.
If you are sourcing new components, review our catalog of precision-engineered guide bars. Our team is available to help verify the correct fitment for a single saw or an entire fleet.
Frequently Asked Questions
Do you measure a chainsaw bar from tip to tip?
No. You measure from the front edge of the chainsaw housing to the tip of the bar. Measuring tip to mounting tail gives an incorrect length.
How do I know what size bar fits my chainsaw?
To determine the correct bar size, consult your chainsaw’s user manual, which lists the manufacturer’s recommended bar lengths and specifications. You must match three critical specs: the bar’s mount pattern (which must fit your saw), the chain pitch (e.g., .325″), and the chain gauge (e.g., .050″). Using an incompatible bar can lead to poor performance and safety risks.
Is a 18-inch bar really 18 inches long?
The effective cutting length is approximately 18 inches. The total physical length is slightly longer due to the mounting section.
Can I put a 20-inch bar on a 16-inch chainsaw?
Only if the engine displacement supports it and the sprocket matches the pitch. Otherwise, it may cause performance issues and mechanical strain.
Where is the size marked on the chainsaw bar?
The bar’s specifications are almost always stamped or printed on the tail end of the bar, near the mounting slots. Look for a series of numbers indicating the effective cutting length (e.g., 18″ or 45cm), chain pitch (e.g., .325″), gauge (e.g., .050″ or 1.3mm), and the required drive link count for the matching chain.
How do I measure the drive links on a chain?
Remove the chain, lay it flat, and count each drive link individually. Alternatively, check the packaging label if available